Effortless Python Environments in Robotmk with RCC
All you need to know about RCC, the 'virtualenv on steroids'

In this blog article, we shed light on the background to the development of RCC, the problems it solves and the immense advantage it brings to the Robotmk project.
Robocorp RCC: Problem solved, benefits for all
About Robocorp
Robocorp is a leading provider of cross-platform process automation.
Not so long ago, the company relied on Robot Framework and even maintained its own Mate library, the so-called rpaframework library. (If you are using this somewhere in your Robot Framework suites, you should think about replacing it - more about this later).
Since the beginning of 2024, however, Robocorp has been heavily targeting Python developers; while this departure is a shame for the Robot Framework community, RCC is still the underpinning for Robocorp automations.
Let’s take a closer look.
The Robocorp use case
Robocorp customers create automations locally and want to have them executed in Robocorp’s cloud infrastructure.
An example of such an automation:
- loading an Excel file from an IMAP mailbox
- reading data from a REST API for each data record
- and then sending the results per data record to a recipient.
(Python pros may yawn here 😄, but the idea behind it is that no local infrastructure needs to be operated for the reliable execution of these automations).
RCC is certainly as old as the business idea of Robocorp itself - because before the first customer, a very fundamental problem had to be solved:
How can the environments with all their dependencies be reproduced reliably and platform-independently so that the users’ automation code ends up being something like “portable”?
A mechanism was therefore needed to describe such environments in an abstract way so that they could be rebuilt exactly elsewhere.
This is how the command line tool RCC (Robocorp Command Line Control) was created.
RCC uses abstract definitions to create isolated Python environments.
These environments encapsulate all the necessary libraries and dependencies and thus ensure that the applications run independently of each other and without conflicts.
Advantages for Robotmk
A word of warning at this point: if you dig into the Robocorp documentation now, you may end up on the wrong track, because the documentation is very RPA-heavy in all possible places and focussed on Robocorp’s use case. Unfortunately, this cannot be changed.
However, it helps to know that in Robotmk only a small part of all the RCC functions are used at all. Normally, the Robotmk user will hardly come into contact with RCC.
Robotmk benefits from RCC simply because it enables the creation of such isolated Python environments.
Understanding RCC
To explain RCC, I like to use a
Analogy to Docker
As you probably know, Docker containers are lightweight, portable units that contain software and all its dependencies. This allows applications to run consistently on different environments/platforms.
A
Dockerfiledescribes what the underlying “Docker image” of a container should look like: the operating system, software to be installed, configuration commands, provided files, etc.
An example (don’t pay attention to the details, they are not that important):
FROM ubuntu:latest
RUN apt-get update && apt-get install -y \
    curl \
    vim \
    git
CMD ["bash"]
With this Dockerfile I can build a blueprint (“image”) called my-workplace and start a first container called my-container from it.
docker build -t my-workplace .
docker run -dit --name my-container my-workplace /bin/bash
Assuming I had neither vim nor curl on my host operating system, I could still execute these commands in the container operating system:
docker exec my-container curl http://www.robotmk.org
docker exec my-container vim my-personal-notes
So all you need to recreate my example on your host is this dockerfile. It specifies what the image should look like.
Now we are not far away from RCC.
How RCC works
One difference that immediately catches the eye with RCC: instead of a single file, RCC involves two files, which I will explain below.
Even if only a few components are relevant for Robotmk (marked with ⭐️), they still need to be present. It is therefore worth understanding them.
robot.yaml
The main configuration file of the robot.
If you want to create a new robot for Robotmk, you can use this file as a framework.
No adjustments are necessary.
# "Tasks" are predefined entry points for automation. Irrelevant for Robotmk.
tasks:
  my_cool_task:
    shell: python -m robot --report NONE --outputdir output --logtitle "Task log" tests.robot

# ⭐️ Probably the most important line in this file - but one that never needs to be changed.
environmentConfigs:
  - conda.yaml

=== If the robot is called as an RCC task (1):
# - Output directory for Robot Framework
artifactsDir: output

# - Extension of the search path for binaries
PATH:
  - .
# - Extension of the search path for Python packages
PYTHONPATH:
  - .
# Only required if a robot is to be zipped and pushed elsewhere.
ignoreFiles:
  - .gitignore
conda.yaml
Describes the dependencies to be installed.
This includes everything - starting with the programming language(s) to be installed.
Below is a template for a typical conda.yaml that describes an environment for Playwright-based tests:
# Use conda-forge as package source
channels:
  - conda-forge

dependencies:
  # ⭐️ Programming languages and tools to be installed by conda-forge
  - python>=3.12
  - pip=23.2.1
  - nodejs>=20
  # ⭐️ Python packages to be installed by Pypi (via pip command)
  - pip:
    - robotframework==7
    - robotframework-browser==18.2.0

# ⭐️ Steps to be carried out after installation. In this case, the initialisation of the NodeJS packages is triggered with this command.
rccPostInstall:
  - rfbrowser init
You can also use this file again and again as a base template. rccPostInstall is actually only necessary for the installation of the browser library - the point can be omitted if the test is not web-based at all.
In a nutshell:
robot.yaml- main config, extremely static in the case of Robotmkconda.yaml- definition of dependencies, depends on the Robot Framework Suite.
Use of RCC
It is important to know where RCC is used in the Robotmk workflow - and if so, how:
- During the
regular execution of the tests by theRobotmk scheduler on atest client , everything happens in the background andautomatically :- The RCC binary is installed together with the Checkmk agent to
C:\ProgramData\checkmk\agent\bin. - The Robotmk Scheduler creates the environments for all suites where RCC is to be used.
- The RCC binary is installed together with the Checkmk agent to
- The situation is different on a
development computer on which the user wants to run a testmanually :- This computer is (usually) not in monitoring, ergo RCC is not present there at all.
- The user must create the environment manually and ensure that it is active in the development environment.
As you can see, RCC is so well integrated into Robotmk that apart from installing the Checkmk agent on the target host, nothing else is necessary. We will take a closer look at the use of RCC as a user below.
Download RCC
Here you can follow the instructions as I have written them in the quick start article under Download RCC. RCC should be accessible via the user variable %PATH%.
Develop in an RCC environment
This is the only point where you - at least for now, but we already have ideas - cannot completely avoid the command line: before you can start writing your Robot Framework tests with VS Code (recommended, but other editors are also possible), you must create and activate the corresponding RCC environment.
Make sure that you have installed Visual Studio Code and the extension RobotCode.
We will use the Robot-Suite from the quick start tutorial as an example.
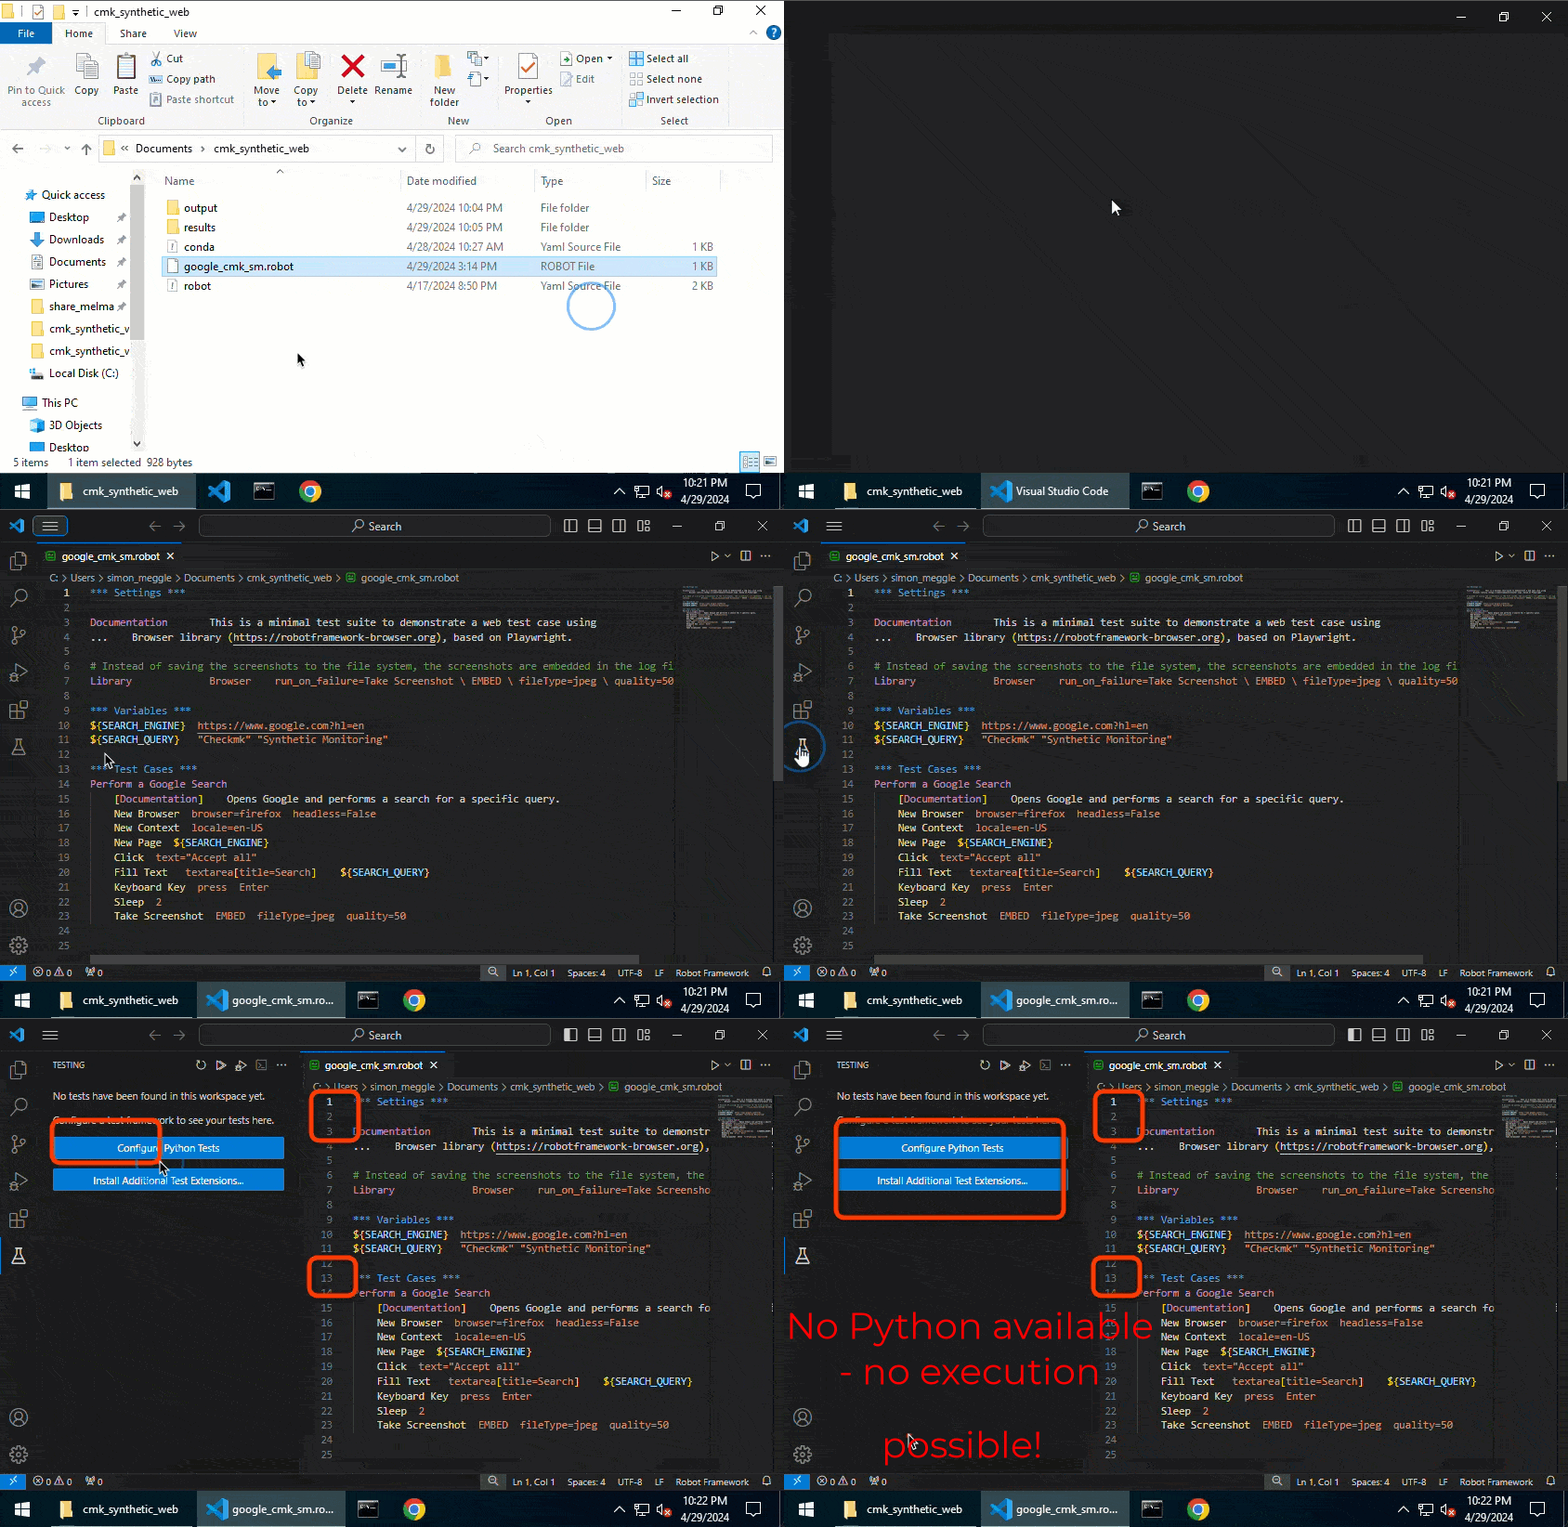
The following video shows:
- Opening the
.robotfile directly in VS Code. Although the RobotCode extension is installed, no controls are displayed to start the test. This is because the extension cannot find a Python interpreter, let alone a RobotFramework installation.

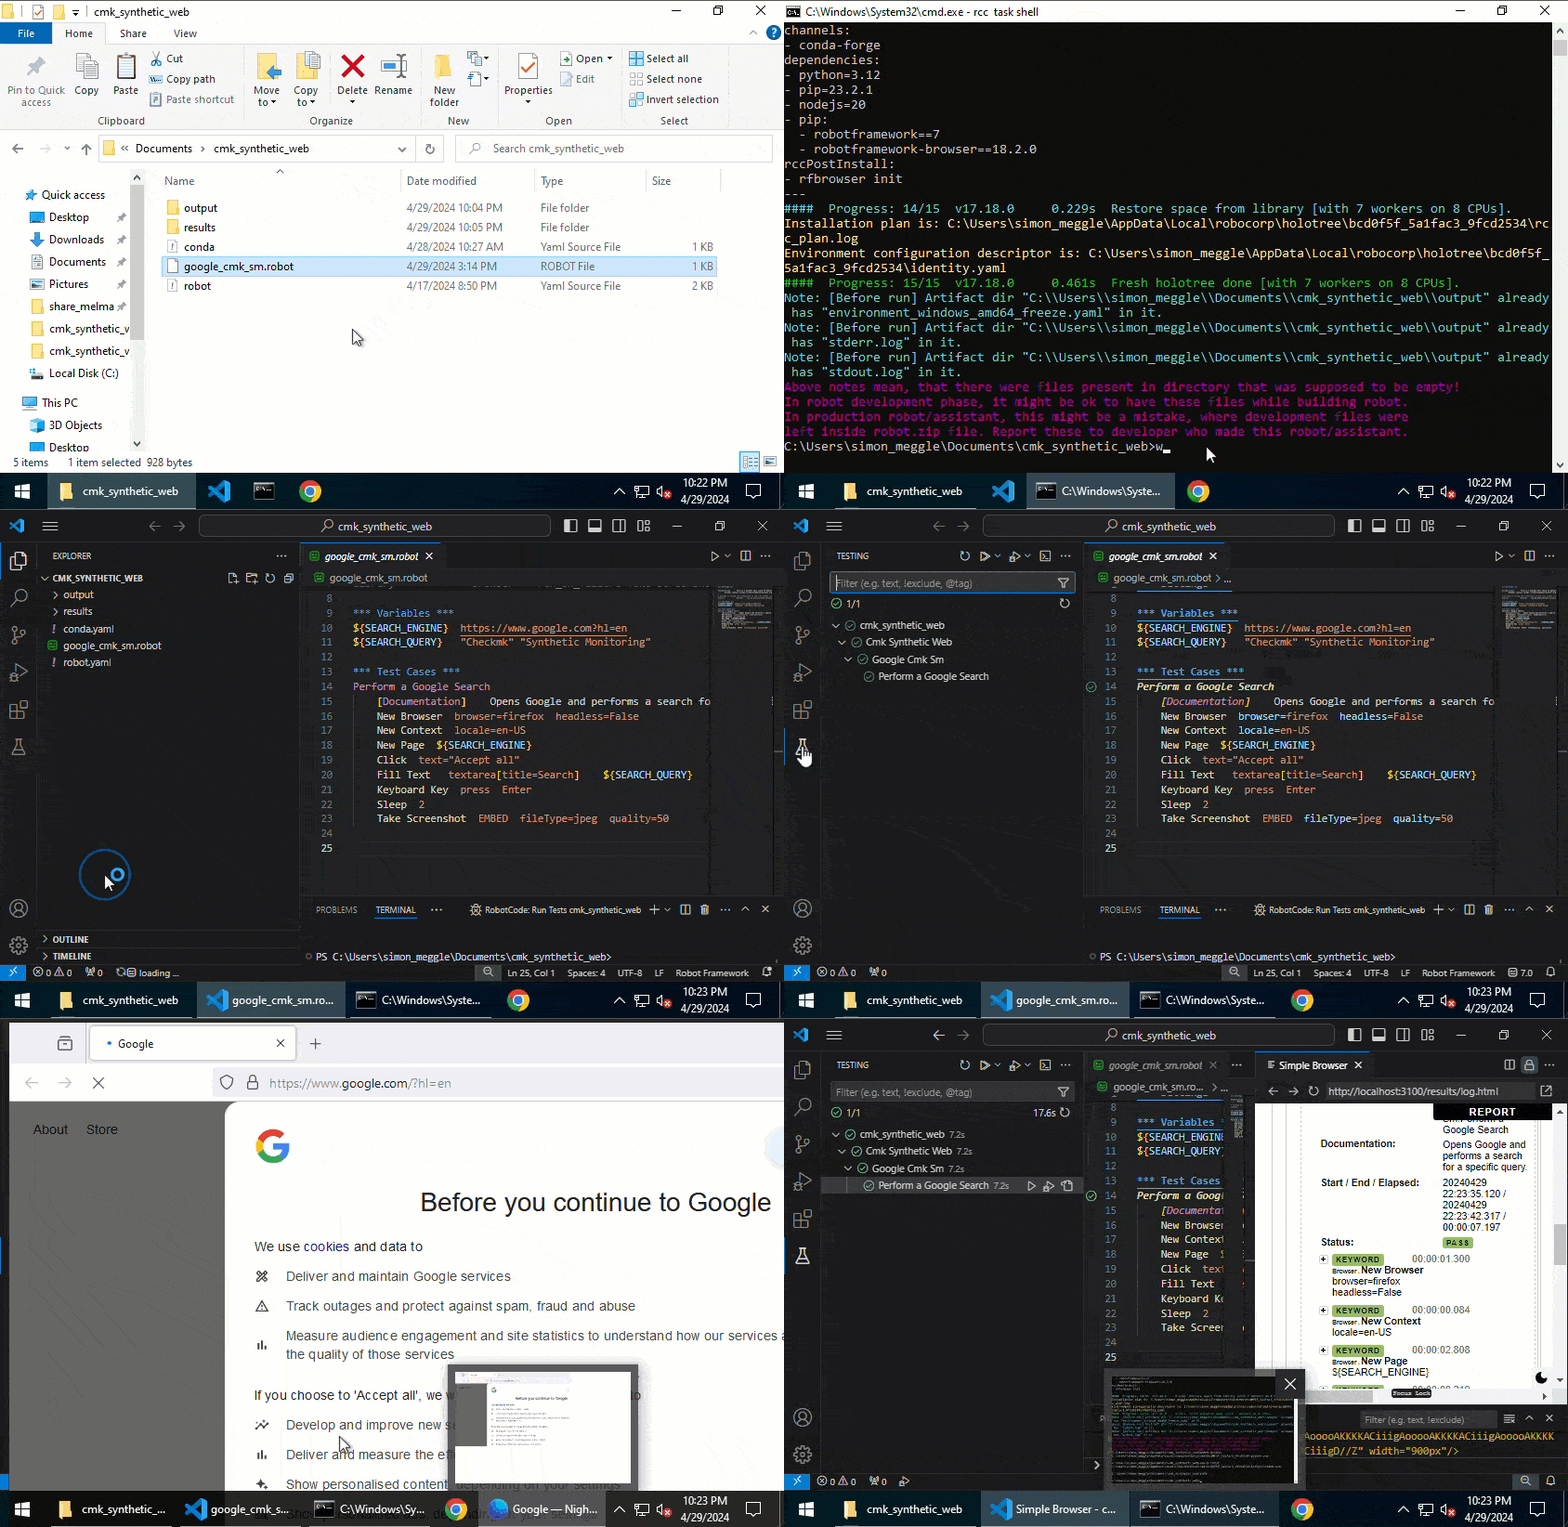
In the second video you can see how the RCC environment is created and the VS Code started in it has access to Python - the robot can be started:
- Open a
cmdin the suite directory (=where the two RCC filesrobot.yamlandconda.yamlare located). rcc task shellto activate the Python environment. If it does not exist, it will be recreated.code .to open the current folder in VS Code. As the paths in the CMD have already been “bent” to the RCC environment at this point, this CMD now behaves as if Python and all packages were in the operating system. Also VS Code uses these paths.

I hope the analogy to Docker has clarified how RCC helps to run robots consistently and without much effort across different platforms.

