Edge detection for the ImageHorizonLibrary
Which problems can arise of image recognition within ImageHorizonLibrary - and how we solved it.
Edge Detection in the ImageHorizonLibrary - an experiment with great potential.
(Note: instead of ImageHorizonLibrary I am using the acronym IHL.)
TL’DR
- The image pattern based approach für UI automation attempts to find a sub-image on a screenshot of the current desktop. The region of the detected area can then be clicked on.
- However, already 1 deviating pixel is enough to let this method fail in the default settings.
- Libraries like IHL allow smaller pixel deviations by accepting an additional tolerance parameter (
confidence,tolerance,similarity…). - Obviously identical images with massive pixels of minimum deviations are still a problem, though.
- “Canny edge detection” is a proven method to extract only the lines from images which describe areas with high contrast.
- Gautam Ilango and me have filed a pull request to the IHL which adds this method as an additional strategy.
Basics: This is how the image recognition works
The Robot Framework library ImageHorizon is based on the Python module PyAutoGUI. With this module, mouse and keyboard can be automatically controlled on Linux, Mac and Windows. Thanks to the IHL, this technology can be used in Robot Framework tests, for example in end2end monitoring with Robotmk.
To ensure that the library knows where it should move the mouse pointer to (e.g., to complete a click), it must first search this target region with a so called reference picture.
Let’s take this dialog box as an example:
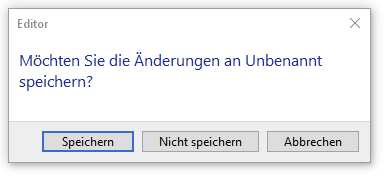
In order to press the button “Nicht speichern” (‘do not save’), the library needs to search for a reference image (nicht_speichern.png) which you have to create in the project folder:

Within the test, the IHL keyword Click Image (link) is used: the only argument it needs is the name of the reference image (without its extension):
Click Image nicht_speichern
The keyword Click Image works as follows:
- create a screenshot of the current screen ("haystack")
- load the reference image ("needle")
- searche the needle within the haystack
Side note: In programming, images are represented as a matrix of numbers. These numbers describe the intensity of each pixel in the picture. In contrast to grayscale images (which have 1 value per pixel), RGB images are represented by a matrix of 3 values per pixel.
“Searching” a reference image in the haystack image is therefore the mathematical task to determine the coordinate of a (sub) matrix within another (bigger) matrix.
Small pixel deviations and their solution
The procedure described above works as long as the needle matrix exists exactly within the haystack.
Even one different RGB value (e.g. (233,40,22) instead of (233,41,22)) ends in an empty result. Game Over. Test FAILED.
“Deviation …” Hold on - either an application runs or it doesn’t. How should a deviation of individual pixels happen?"
At first glance the scenario of pixel deviations seems to be absurd: one would like to believe that the haystack images are completely predictable. This is why you should not rely on that:
- Image compression: It is common practice that End2End monitoring connects to the applications via RDP or Citrix (for example to measure the performance of remote connections).
Such systems are often preconfigured to dynamically compress the transferred screen data to make working over lame network connections possible. User won’t notice the resultant artifacts, but End2End-Tests will fail.
- Font Anti-Aliasing (also: “font-smoothing”): computer fonts are vector based, whereas monitors are raster based. Anti-Aliasing is used by the computer to make the line of a font to be “between” two pixels. This adds artificial halftone pixels to the displayed text which make the test to appear smoother and easily readable. See Wikipedia for more information:

- Bonus reason no. 3: 3rd party sources. See practical example below.
I guess these were the problems which the authors of the ImageHorizonLibrary, Eficode, faced; anyway, the IHL provides an option called confidence (Keyword: Set Confidence). confidence is a value between 0 and 0.99 and describes how many percent of the needle image have to be contained in the haystack image.
# Setting confidence during library import
Library  ImageHorizonLibrary  confidence=0.95
# alternative way: setting during the test
Set Confidence  0.95
confidenceneedspython-opencvto be installed.
confidence: a practical example
The following picture shows the letter “a” in a picture with the dimensions of 10x10px:

Let us assume that this letter should be recognized on the desktop and the picture above is now used as a reference image (needle).
The image will always be recognized.
Now we enable the font anti-aliasing in our operating system’s settings. It adds additional pixels (~20) to the original image:

Now the test fails.
We have a bad suspicion: font smoothing! We lower the confidence value to 0.9. Only 90% of the needle image have to match now.
The test still fails.
Again we lower confidence to 0.8 and - horray: IHL recognizes the letter again. The non-matching pixels are shown in the following image in yellow. That are 19 pixels of 100, which means we are just below the tolerance of 20%:

Confidence: an intermediate conclusion
Small pixel deviations can be catched by carefully lowering the confidence level.
Always make sure that the configuration of systems you are using for execution of End2End tests follows a strict scheme.
The danger of massive pixel deviations
All examples shown so far, with small pixel deviations, were executed with the image recognition method of ImageHorizonLibrary, which is based on pyautogui.
What about larger pixel deviations?
Even larger…? Come on.
Yes. That happens.
Why confidence can fail
Let’s pick up the last example and assume that the letter should also be recognized when its background color changes. This happens for example when the mouse pointer “hovers” over a button. (Apart from that, this error cannot happen in web based tests done with Selenium or Playwright!)
Again, in yellow: the pixels which do not match with the reference image:

3/4 of the upper image is different from the original image below. Only 23% of the pixels match.
In purely arithmetical terms also a confidence value of 0.2 works (assuming that the haystack image is as small like that). But in practice, the haystack is always a full screen, where the algorithm will find dozens of matching regions!
Practical example (turn every stone…)
I want to substantiate this case with an example from a customer project. Lession learned: don’t take anything as granted.
I had implemented a Robotmk End2End monitoring test for a highway management application.
During the integration phase, I discovered that the test which should check the proper loading of the map failed in 3-5% of the executions. The only error I got: Image not found.
Not seriously, I thought, conscientiously checking all the logs. But without any new finding.
And of course, I also fiddled around with confidence. :-) But it was painful to have no feedback about what the library exactly detected. The results got even worse.
In the course of my error search I expanded the test so that on every run it first took a partial screenshot (btw, a really cool feature of Screencap Library) of exactly the map region which should be checked.
The following two images show
- the reference image
- the cropped screenshot image
and obviously, they seem to be fully identical, even when zooming in (don’t they?):

After some time, I compared the MD5 checksums of all those screenshots.
I was pretty astonished: indeed, most of the checksums were equal (the reference image matched), but a small amount of the checksums, taken on three different hosts, were different! (Look at the b17 und cd2 sums…!)
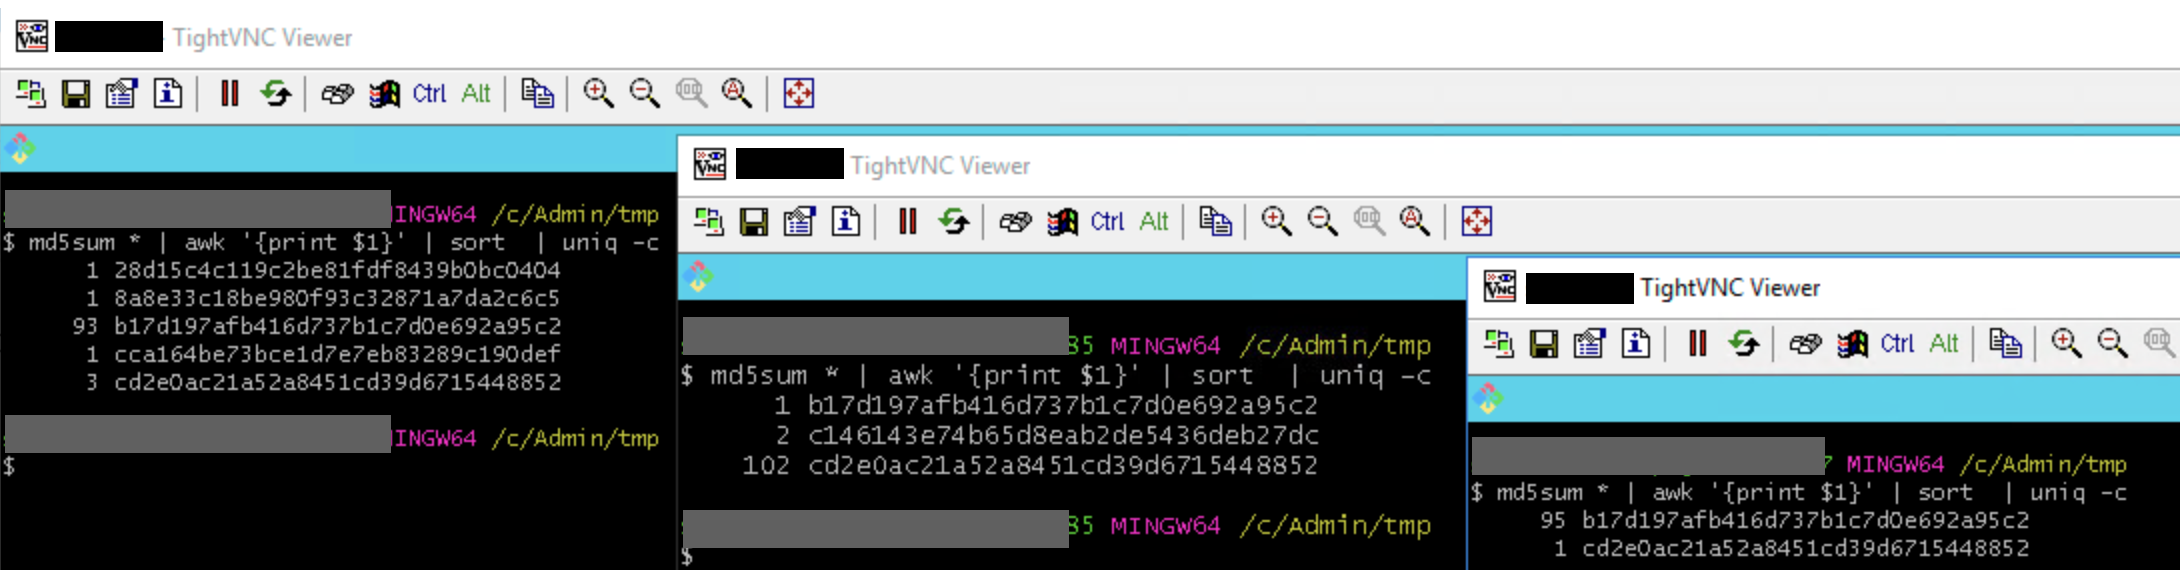
(Yes, of course: replacing those aged test VMs with fresh ones would probably have resolved the issue or at least provided more insights. But they would have taken too long to order….)
I then uploaded both images to an online image comparison service.
One and the same Map. Two images. (To avoid misinterpretations: the red pixels are the differences…)
OMG… Occasionally, the maps are indeed loaded in a different way from the map provider. Strongly magnified, you can divine a minimum change in brightness at some regions.
But… why? I won’t find out the solution to that question. I just learned something (again): when you are searching for the cause of an error, turn every stone…
Edge detection to the rescue
The brilliant idea came from colleague Frank Striegel (Noser Engineering AG, CH): needle and haystack have to be processed before the image comparison to remove all “ambient noise” (wherever it may come from).
Based on his prototype, I developed a custom keyword which pre-processes both images with the edge detection algorithm from the skimage framework for Python. The comparison is then done the on the resulting images. It worked pretty well.
Extending the ImageHorizonLibrary with skimage
Soon I rejected the idea to write a complete new library for that use case. IHL is such a great library and I had implemented a lot of tests with it. I simply like it because of its substructure (Pyautogui, that’s all). For comparison only: the SikuliXLibrary for Robot Framework requires Java (!) and a “JRobot Remote Server” (!!) in order to translate the Python Keywords into Java commands.
During the last weeks, Gautam Ilango and I intensively worked on an extension of the ImageHorizonLibrary. It offers the great possibility to use edge detection in End2End tests. Now we are close to send a pull request to Eficode - and we are very curious about their reponse! :-)
Canny edge detection in a nutshell
You can find a lot of information about the edge detection algorithm in the internet. We are using the so-called “Canny Edge Detection” algorithm (developed by John Francis Canny in 1986, brilliantly explained here. It consists of those five steps:
- Gaussian blur to reduce noise. The
sigmaparameter defines the intensity of the filter. - edge detection according to Sobel: determination of the brightness curve along the x and y axes; determination of peaks by derivation
- non-max-suppression: edges of a guaranteed width of 1px by removing irrelevant edges
- Double threshold: classification of egde pixels into strong, weak and low candidates
- Hysterese: removing weak candidates respectively allocating them to adjacent candidates
The effect of the sigma parameter in step 1 on the detected edges is shown on Wikipedia:
The strategy “edge”
Our extended version of the IHL is fully compatible to the existing version. Using the “Strategy” design pattern I was able to make the adaption as less invasive as possible.
This means that if you import the IHL library as usual, it uses till the pyautogui module for image recognition:
Library ImageHorizonLibrary reference_folder=...
Now let’s say that a needle image cannot be found in the haystack because of too much deviating pixels. In that case (and only then!) you have a reason to switch the strategy with the keyword Set Strategy:
Set Strategy edge
From that moment on, all existing keywords of the IHL are using edge detection for image recognition. Both reference and screenshot image are reduced to their very relevant content (= the edges) bofore they are compared against.
In certain situations it possible that even after the edge detection the reference image can’t be found on the screenshot (e.g. when artifacts of RDP/Citrix compression resulted in a little different edge line).
But pixel deviations like this occur only along the edge line, thus they are relevant imageinformation. In this case, a smaller confidence level of 0.9 for example is sufficient to get a robust image detection even in this case.
The image debugger
If this were it all, the IHL would have “another” recognition strategy which “somehow works better”, but you wouldn’t still know why.
To be able to fine-tune confidence in both strategies (and others in skimage), a new keyword Debug Image was created. Simply use it right before the line in a Robot test where the recognition of a reference image is unwilling to work:
Debug Image
Click Image  image_varying
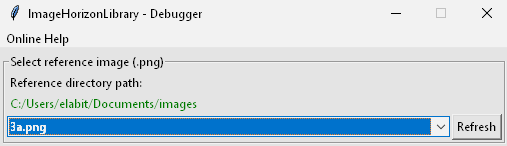
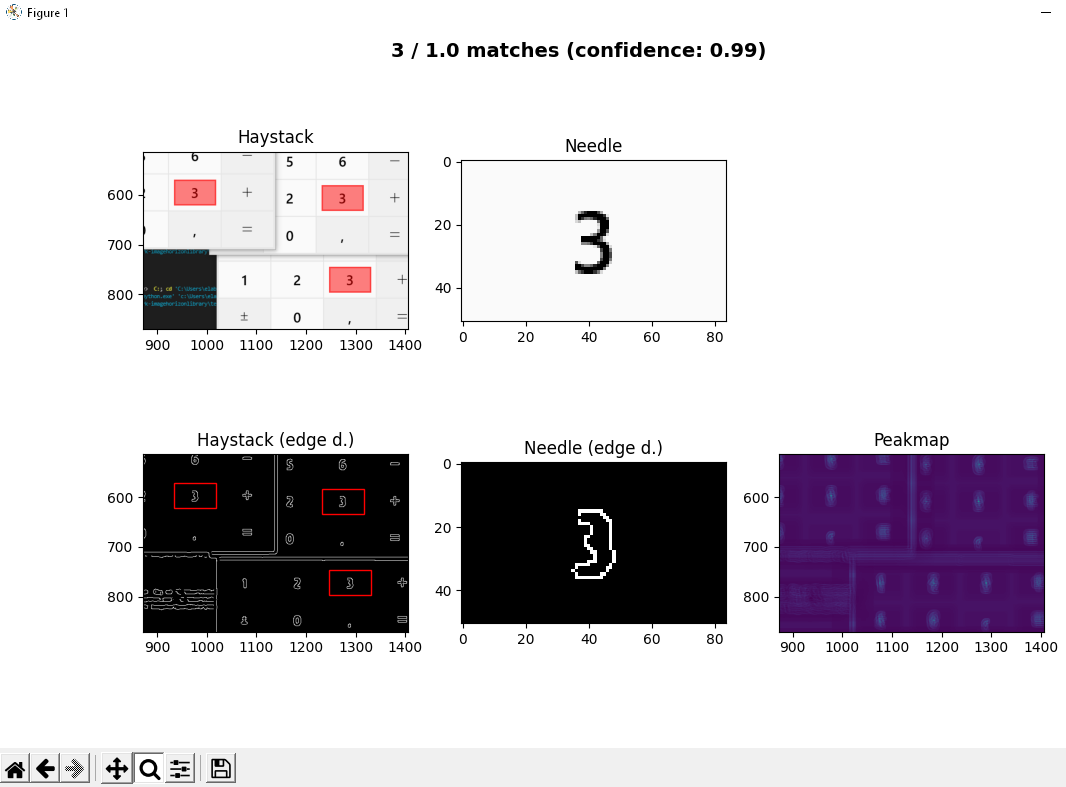
After the suite restart, the test will pause at the problematic position and open the ImageHorizon-Debugger-GUI, which was crafted by Gautam Ilango.
The debugger allows to select the needle image from the reference_folder:
Below of that there are two sections for both strategies with a button Detect reference image and a handful of sliders for different parameters:
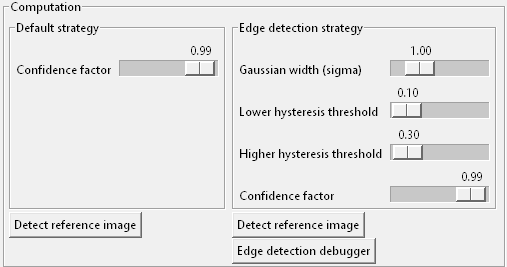
When you click this button the debugger will try to detect the reference image with the according strategy on the current desktop. It will do it exactly like during a keyword execution like Wait For.
The viewer in the lower area of the window shows the needle image and, left of that, a thumbnail image of the current haystack image with all matching regions:

The debugger UI gives you answers to two important questions:
- How many matches? - Up to now, you were in the dark here. In case of multiple (equal) matches the library always takes the first one - without any warning. There is no guarantee that this order won’t change.
“Matches found” helps to decide whether it is better to search first for an unique “fixed point” and to navigate from there with relative keywords likeClick To The Right Of. - How is the detection quality? - Up to now it was difficult to find a proper value for
confidence. “Max. Peak Value” indicates the percentage of matching pixels in the best matching region. This eases fine-tuning ofconfidencea lot.
As soon as you are satisfied with the settings, you can copy/paste the keyword Set Strategy into the Robot test file.
A click on “Edge detection debugger” opens another window which shows needle and haystack images before and after the edge detection. The viewer also allows to zoom into the images in order to inspect the regions:
Thanks to this visual feedback, confidence (and in case of skimage also sigma, low_threshold and high_threshold) can now be adjusted in a way that preferably only one single match can be achieved.
“Matches” are only counted if the found area contains more similar pixels than set by
confidence. Even if you see more than one match while debugging, the strategy always returns only the coordinates of the best match during test execution.
Conclusion
Our extension to the ImageHorizonLibrary makes application tests possible even if the haystack image was “optimized” or “falsified” (this is in the eye of the beholder…) due to image compression, font smoothing etc., or even if content from external sources cannot be taken as predictable (as shown in the example of the highway operator application).
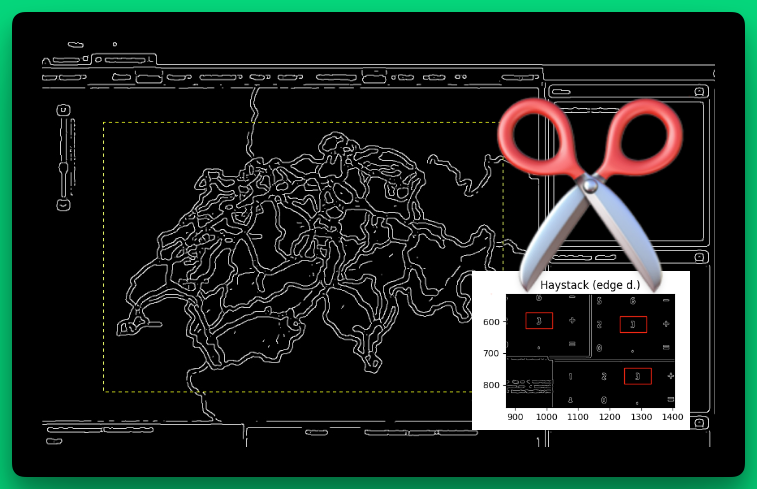
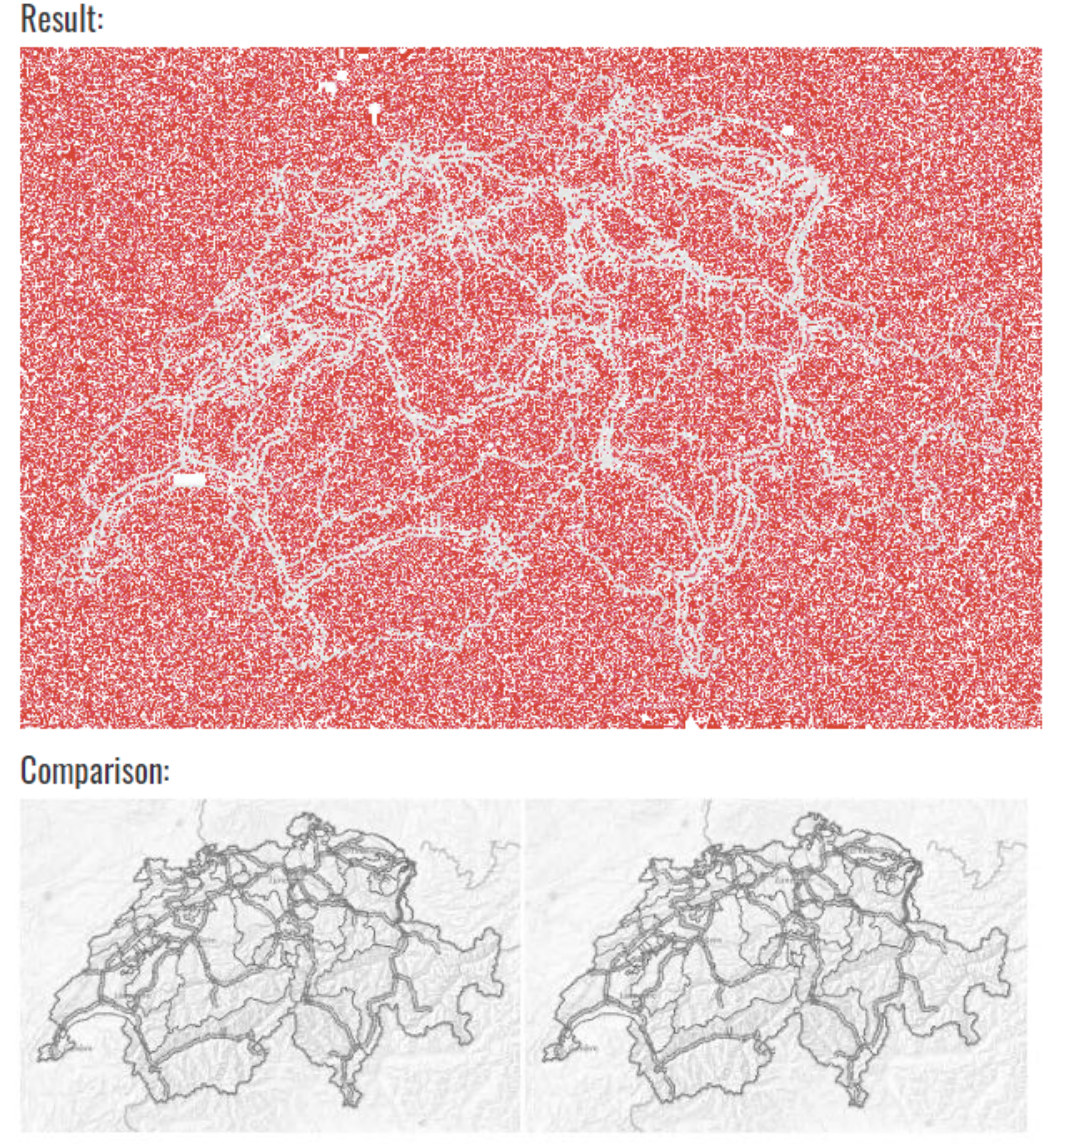
Apropos, this is how the swiss national map looks like after edge detection (the yellow dashed line shows the dimensions of the reference image):
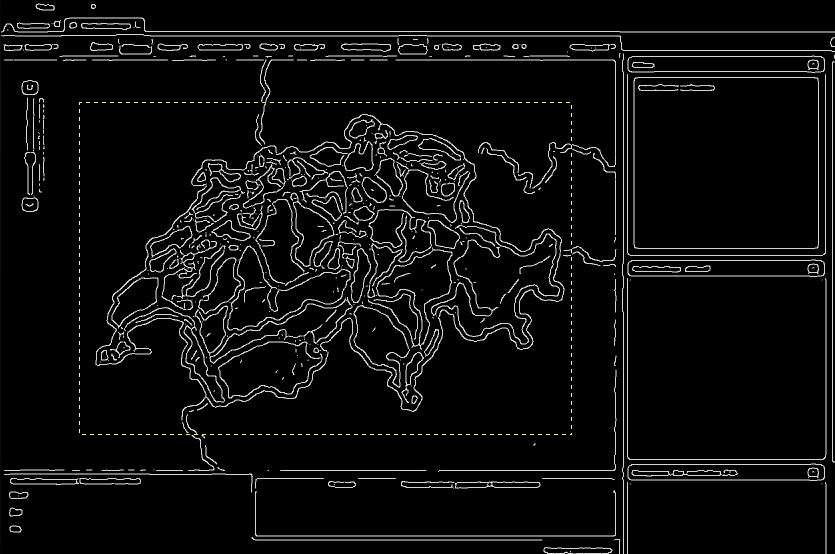
We (Gautam and me) are very proud about this further development which we have presented to Eficode as a pull request on Github.
Updates
Until the pull request gets accepted, you can try out the current state of the edge detection strategy as follows:
# --- create a new virtual environment
virtualenv .venv
# on Linux
. .venv/bin/activate
# on Windows
.venv/Scripts/activate
# --- install RF
pip install robotframework
# --- clone the repository, switch branch
git clone [email protected]:simonmeggle/robotframework-imagehorizonlibrary.git
cd robotframework-imagehorizonlibrary
git fetch -a
git checkout skimage
# --- install the current development state as "editable" module
pip install -e .
2023-02
I was able to present my experiences at Robocon 2023 as part of a techtalk:
Towards the end of the video, I also explain the current state of affairs: unfortunately, Eficode has not yet been willing to hand over the library to another maintainer - despite the many open issues and the lack of time for maintenance and further development (as they themselves admitted).
I think a fork with a permanent dependency on Eficode’s code base is a very bad idea. The idea is to completely rewrite the library with these points in mind:
- Fixing open bugs
- Adding long overdue keywords
- Implement the edge detection strategy